Tip
Download this tutorial as a Jupyter notebook, or as a python script with code cells. We highly recommend using Visual Studio Code to execute this tutorial.
Tutorial 4: Working with Image Masks
This tutorial explains how to work with masks in optimap to select regions of interest in images and videos. Masks are powerful tools for isolating specific areas for analysis, ignoring irrelevant parts of an image, and extracting meaningful data from your recordings.
What are Masks?
In optimap, masks are binary (boolean) arrays where:
Truevalues indicate pixels that belong to your region of interestFalsevalues indicate pixels that should be ignored or considered as background
Masks are commonly used to:
Focus analysis only on tissue regions
Exclude noisy borders or artifacts
Separate specific anatomical regions (e.g., atria from ventricles)
Remove background areas that might skew calculations
Getting Started: Loading Example Data
Let’s begin by loading an example video and extracting a single frame to work with:
import optimap as om
import numpy as np
import matplotlib.pyplot as plt

filepath = om.download_example_data('VF_Rabbit_1_warped.npy')
video_warped = om.load_video(filepath)

frame = video_warped[0]  # First frame for creating our masks
1. Creating Masks
optimap provides several methods to create masks, from automatic detection to manual drawing. Let’s explore each approach.
Automatic Mask Creation with Thresholding
The simplest way to create masks is through automatic thresholding, which separates bright regions (usually tissue) from dark regions (usually background). optimap provides two key functions for this:
image.background_mask(): Creates a mask of background areas (typically darker regions)image.foreground_mask(): Creates a mask of foreground areas (typically brighter regions)
These functions use the GHT algorithm [Barron, 2020] to automatically determine the optimal threshold:
# Create a background mask (True for background pixels)
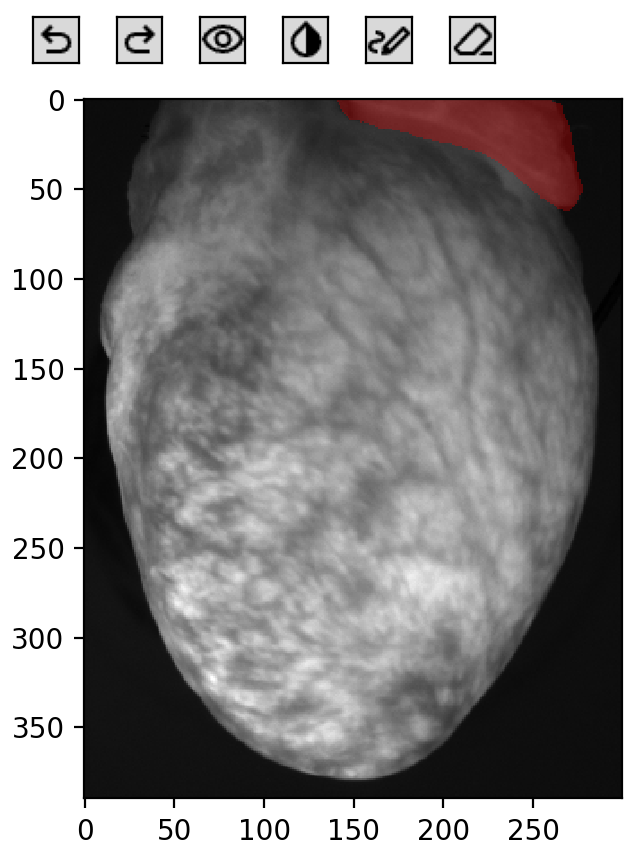
background_mask = om.background_mask(frame, title='Automatic background mask')
# Save the mask for later use
om.save_mask('background_mask.png', background_mask)
Creating mask with detected threshold 401.0

In the visualization above, background pixels (True values) are highlighted in red. The function automatically determined a threshold value to separate background from tissue.
If the automatic threshold doesn’t work well for your image, you can manually specify a threshold value:
# Create a foreground mask with manual threshold (True for foreground/tissue pixels)
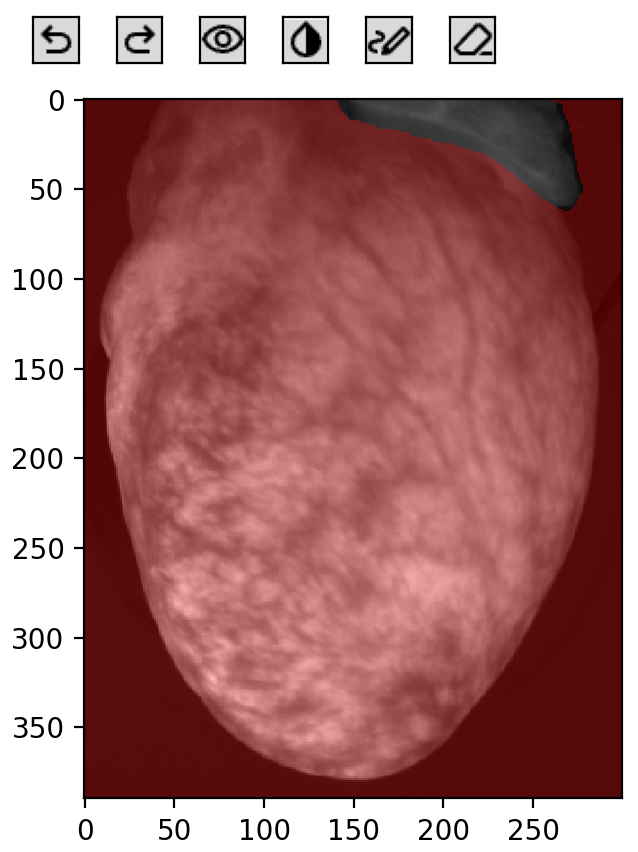
foreground_mask = om.foreground_mask(frame, threshold=500, title='Manual threshold foreground mask')

Interactive Mask Drawing
For more complex regions that can’t be captured by simple thresholding, optimap provides an interactive drawing tool with image.interactive_mask(). This is especially useful when you need to select specific anatomical regions:
# Start with the foreground mask and refine it manually
manual_mask = om.interactive_mask(frame, initial_mask=foreground_mask)
When you run this code, an interactive window appears where you can draw and edit the mask:
The following table lists the available keybindings and mouse actions for the interactive mask tool:
Key/Mouse |
Action |
|---|---|
|
Zoom in/out |
|
Undo |
|
Redo |
|
Draw/Lasso mode |
|
Erase mode |
|
Toggle mask visibility |
|
Invert mask |
|
Quit and return the mask |
Saving and Loading Masks
Once you’ve created a mask, you can save it for future use:
# Save a mask with the original image for context
om.save_mask("custom_mask.png", manual_mask, image=frame)

# Load the mask back
loaded_mask = om.load_mask("custom_mask.png")

# Visualize the mask
om.show_mask(manual_mask, image=frame, title='Manual mask');

Including the image parameter when saving masks embeds the image as context, which is useful for editing in external programs like GIMP. The mask is stored as the alpha channel of the image.
Creating Masks Programmatically
You can also create masks using NumPy operations for more complex or algorithmic approaches:
# Create a circular mask
circle_mask = om.image.disc_mask(frame.shape, center=(100, 150), radius=50)

# Combine masks with boolean operations
combined_mask = foreground_mask & circle_mask  # Intersection (AND)
union_mask = foreground_mask | circle_mask     # Union (OR)
2. Refining Masks
Raw masks often need refinement to be truly useful. optimap provides several functions to clean up and adjust masks.
Morphological Operations: Erosion and Dilation
These operations shrink or expand the mask boundaries:
# Use the inverted manual mask for these examples
mask = np.logical_not(manual_mask)  # Invert mask to select the ventricles

fig, axs = plt.subplots(1, 3, figsize=(15, 5))

# Create eroded and dilated versions of the mask
dilated = om.image.dilate_mask(mask, iterations=10, show=False)  # Expand borders
eroded = om.image.erode_mask(mask, iterations=10, border_value=True, show=False)  # Shrink borders

# Display all three for comparison
om.show_mask(mask, image=frame, ax=axs[0], title='Original')
om.show_mask(eroded, image=frame, ax=axs[1], title='Eroded (shrunk)')
om.show_mask(dilated, image=frame, ax=axs[2], title='Dilated (expanded)')

plt.tight_layout()
plt.show()

Filling Holes and Finding the Largest Component
Masks sometimes contain unwanted holes or isolated small regions. These functions help clean them up:
Use image.fill_mask() to fill holes in the mask, to keep only the largest connected component (island) of the mask use image.largest_mask_component(). The image.largest_mask_component() function also has a invert argument to invert the mask before selecting the largest component (e.g. to keep the largest hole in the mask when working with background masks).
# Create a mask with holes and isolated small regions for demonstration
mask = om.foreground_mask(frame, threshold=1800, show=False)

fig, axs = plt.subplots(1, 3, figsize=(15, 5))

# Show original mask
om.show_mask(mask, image=frame, title='Original with holes', ax=axs[0])

# Fill enclosed holes
om.image.fill_mask(mask, image=frame, title='Filled holes', ax=axs[1])

# Keep only the largest connected region
om.image.largest_mask_component(mask, image=frame, title='Largest component only', ax=axs[2])

plt.tight_layout()
plt.show()

Advanced Morphological Operations: Opening and Closing
These operations combine erosion and dilation to achieve more sophisticated results:
Opening (erosion followed by dilation): Removes small protrusions and isolated regions
Closing (dilation followed by erosion): Fills small holes and connects nearby regions
See the scipy documentation for more information on morphological operations.
# Create a new demonstration mask
mask = om.foreground_mask(frame, threshold=1400, show=False)

fig, axs = plt.subplots(1, 3, figsize=(15, 5))

# Show original mask
om.show_mask(mask, image=frame, title='Original', ax=axs[0])

# Apply opening (erosion then dilation)
om.image.open_mask(mask, iterations=10, image=frame, ax=axs[1], title='Opening (removes small features)')

# Apply closing (dilation then erosion)
om.image.close_mask(mask, iterations=10, image=frame, ax=axs[2], title='Closing (fills small holes)')

plt.tight_layout()
plt.show()

3. Applying Masks to Data
Now that we’ve created and refined masks, let’s see how to apply them to our video data. There are several ways to use masks:
Excluding Regions from Analysis
A common use case is to exclude background or uninteresting regions from analysis by setting them to NaN:
# Create a refined mask - here we're choosing to slightly expand our manual mask
# to ensure we fully cover the region we want to exclude
mask = om.image.dilate_mask(manual_mask, iterations=2, image=frame, show=False)

# Convert video to float type (required for NaN values) if not already
video_masked = video_warped.astype(np.float32).copy()

# Set masked regions to NaN - they will be ignored in calculations
video_masked[:, mask] = np.nan

# View the resulting video with masked regions
print("Video with masked regions set to NaN:")
Video with masked regions set to NaN:
om.show_video(video_masked)
Extracting Data from Specific Regions
You can use masks to extract data from specific regions of interest:
Summary
Masks are powerful tools in optimap that allow you to:
Isolate regions of interest using automatic, interactive, or programmatic methods
Refine masks through morphological operations like erosion, dilation, filling holes
Apply masks to exclude irrelevant regions or focus analysis on specific areas
With these techniques, you can achieve more accurate and targeted analysis of your optical mapping data by focusing only on the regions that matter for your research question.